

[AWS] Lambda - Invoke SSM + Terraform Project 07
Invoke SSM Document Commands on EC2 Utilizing Lambda


![[AWS] Lambda - Invoke SSM + Terraform Project 07](https://cdn.hashnode.com/res/hashnode/image/upload/v1713257907287/0c837c15-5e34-4f18-8dcb-36ca9c647482.png?w=1600&h=840&fit=crop&crop=entropy&auto=compress,format&format=webp)
Inception
Hello everyone, This article is part of The Terraform + AWS series, And it's not depend on the previous articles, I use this series to publish out AWS + Terraform Projects & Knowledge.
Overview
Hello Gurus, AWS Lambda is a compute service that lets you run code without provisioning or managing servers, Lambda runs your code on a high-availability compute infrastructure and performs all of the administration of the compute resources, Let's you Focus on the Target without managing any servers.
On the other hands, AWS Systems Manager (SSM) is a service from Amazon Web Services that simplifies automating management tasks for your EC2 instances.
Today's Example will Create an SSM Document that holds bash commands, Then will invoke this commands on an EC2 machine using Lambda.
Building-up Steps
Today will Build up an EC2, Lambda, and SSM document, and type down the ssm document script and python script that invoke the ssm document, The Infrastructure will build-up Using 𝑻𝒆𝒓𝒓𝒂𝒇𝒐𝒓𝒎.✨
The Architecture Design Diagram:

building-up steps Details:
Deploy a VPC_1.
Deploy a subnet_1.
Deploy a Internet gateway.
Deploy a route table to route all traffics to the internet gateway.
Deploy an SSM resource & Json Document.
Deploy an IAM Role holds assume ec2, ssm, and attach AmazonSSMManagedInstanceCore policy.
Deploy a Security group allow 22 port from anywhere.
Deploy a key pair to enable SSH on the EC2.
Deploy an EC2 machine and associate the created IAM Role to enable the communication with SSM.
Deploy an IAM Role holds assume lambda, and attach SSMFullAccess, EC2FullAccess policies.
Deploy Lambda holds the last IAM Role.
Create the python script that will invoke the SSM Document.
enough talking, let's go forward...😉
Clone The Project Code
Create a clone to your local device as the following:
pushd ~  # Change Directory
git clone https://github.com/Mohamed-Eleraki/terraform.git

pushd ~/terraform/AWS_Demo/14-lambda_run_SSM
- open in a VS Code, or any editor you like
code . # open the current path into VS Code.
Terraform Resources + Code Steps
Once you opened the code into your editor, will notice that the resources have been created. However will discover together how Create them steps by step.
Configure the provider
- Create a new file called
configureProvider.tf
.tf files is a good way for less code complexity.- Configure the provider as the below code
# Configure aws provider
terraform {
  required_providers {
    aws = {
      source  = "hashicorp/aws"
      version = "~> 5.0"
    }
  }
}

# Configure aws provider
provider "aws" {
  region  = "us-east-1"
  profile = "eraki"  # Remove this line if you configured
  # your AWSCLI as Default
}
VPC Resources Deployment
Create a new file called
vpc.tfDeploy the VPC, Subnet, Internet gateway, and route table Resources as the following code
# Create a VPC holds the ec2 configs
resource "aws_vpc" "vpc_1" {
  cidr_block = "10.0.0.0/16"

  tags = {
    name = "vpc_1"
  }
}

# Create subnet for EC2 instance
resource "aws_subnet" "subnet_1" {
  vpc_id     = aws_vpc.vpc_1.id
  cidr_block = "10.0.1.0/24"

  tags = {
    name = "subnet_1"
  }
}

# Create IGW to allow Internet traffic
resource "aws_internet_gateway" "vpc_1_igw" {
  vpc_id = aws_vpc.vpc_1.id

  tags = {
    name = "vpc_1_igw"
  }
}

# create route table to route all vpc traffic to igw
resource "aws_route_table" "vpc_1_rt" {
  vpc_id = aws_vpc.vpc_1.id

  route {
    cidr_block = "0.0.0.0/0"
    gateway_id = aws_internet_gateway.vpc_1_igw.id
  }

  tags = {
    name = "vpc_1_rt"
  }
}

# Associate subnet with the route teble
resource "aws_route_table_association" "rt_acc" {
  subnet_id      = aws_subnet.subnet_1.id
  route_table_id = aws_route_table.vpc_1_rt.id
}
SSM Resources Deployment
- Create a new directory called
scripts, Then touch a JSON filessmShellConfigs.json
- The SSM JSON Document Content will be as the following
{
    "schemaVersion": "2.2",
    "description": "Use this document to deploy and configure Linux Servers ",
    "mainSteps": [
      {
        "action": "aws:runShellScript",
        "name": "runShellScript",
        "precondition": {
          "StringEquals": [
            "platformType",
            "Linux"
          ]
        },
        "inputs": {
          "runCommand": [
            "#!/bin/bash",
            "mkdir /testDir",
            "touch /testDir/testFile"
          ]
        }
      }
    ]
  }
Create a new file called
ssm.tfDeploy The SSM Resources as the following code
# Create an SSM holds Shell configs
resource "aws_ssm_document" "ssm_document_shell_configs" {
  name          = "ssm_document_shell_configs"
  document_type = "Command"
  content       = file("${path.module}/scripts/ssmShellConfigs.json")
}
IAM Role Resources Deployment
Create a file called
iam.tfDeploy an IAM Role assume lambda and attach SSMFullAccess & EC2FullAccess to be attached to lambda.
Deploy an IAM Role assume ec2, and ssm, then attache AmazonSSMManagedInstanceCore policy to be attached to ec2.
- Deploy the mentioned resource as the below code
# Create IAM role hold SSM full access for lambda
resource "aws_iam_role" "iam_role_ssm_full_access" {
  name = "iam_role_ssm_full_access"
  assume_role_policy = jsonencode({
    Version = "2012-10-17"
    Statement = [
      {
        Action = "sts:AssumeRole"
        Principal = {
          Service = "lambda.amazonaws.com"
        }
        Effect = "Allow"
        Sid    = "111"
      },
    ]
  })

  managed_policy_arns = [
    "arn:aws:iam::aws:policy/AmazonSSMFullAccess",
    "arn:aws:iam::aws:policy/AmazonEC2FullAccess" # Attach AmazonEC2FullAccess policy

  ]
}

# Create an IAM role for SSM
resource "aws_iam_role" "ssm_role" {
  name = "ssm_role"
  assume_role_policy = jsonencode({
    Version = "2012-10-17"
    Statement = [
      {
        Effect = "Allow",
        Principal = {
          Service = "ec2.amazonaws.com"
        },
        Action = "sts:AssumeRole"
      },
      {
        Effect = "Allow",
        Principal = {
          Service = "ssm.amazonaws.com"
        },
        Action = "sts:AssumeRole"
      }
    ]
  })
}

# Attach the AmazonSSMManagedInstanceCore policy to the IAM role
resource "aws_iam_role_policy_attachment" "ssm_policy_attachment" {
  policy_arn = "arn:aws:iam::aws:policy/AmazonSSMManagedInstanceCore"
  role       = aws_iam_role.ssm_role.name
}
EC2 Resources Deployment
Create a file called
ec2.tfDeploy a security group, Key pair, and EC2 Instance as the below code
# Create security group for ec2 instance
resource "aws_security_group" "security_group_1_ec2" {
  name   = "security_Group_1_ec2"
  vpc_id = aws_vpc.vpc_1.id

  tags = {
    name = "security_Group_1_ec2"
  }
}

# Create ingress role for security group - specify your ports to allow as below
resource "aws_vpc_security_group_ingress_rule" "allow_SSH_inbound_traffic" {
  security_group_id = aws_security_group.security_group_1_ec2.id
  #cidr_ipv4         = aws_vpc.vpc_1.cidr_block
  cidr_ipv4   = "0.0.0.0/0"
  from_port   = 22
  ip_protocol = "tcp"
  to_port     = 22
}

# create egress role - allow all
resource "aws_vpc_security_group_egress_rule" "allow_all_outbound_traffic_ipv4" {
  security_group_id = aws_security_group.security_group_1_ec2.id
  cidr_ipv4         = "0.0.0.0/0"
  ip_protocol       = "-1" # semantically equivalent to all ports
}

# Create Key pair for ec2 instnace
resource "aws_key_pair" "kp-1" {
  key_name   = "server_key"
  public_key = file("~/.ssh/id_rsa.pub") # based on your local public key
}

# Create instance profile holds the SSM IAM role in order to attach it to ec2
resource "aws_iam_instance_profile" "iam_profile" {
  name = "iam_profile"
  role = aws_iam_role.ssm_role.name
}

# Create an EC2 Instance
resource "aws_instance" "ec2_instance_1" {
  ami                         = "ami-0a3c3a20c09d6f377"
  instance_type               = "t2.micro"
  associate_public_ip_address = true # avoid to submit this on production , at least use security group to accecpt traffic
  subnet_id                   = aws_subnet.subnet_1.id
  security_groups             = [aws_security_group.security_group_1_ec2.id]
  key_name                    = aws_key_pair.kp-1.key_name
  iam_instance_profile        = aws_iam_instance_profile.iam_profile.name

  tags = {
    name = "ec2_instance_1"
  }

  #   provisioner "local-exec" {
  #     command = "sudo yum install -y https://s3.amazonaws.com/ec2-downloads-windows/SSMAgent/latest/linux_amd64/amazon-ssm-agent.rpm && sudo systemctl start amazon-ssm-agent"
  #   }

  # Install the SSM Agent
  user_data = <<-EOF
              #!/bin/bash
              sudo yum install -y https://s3.amazonaws.com/ec2-downloads-windows/SSMAgent/latest/linux_amd64/amazon-ssm-agent.rpm
              sudo systemctl start amazon-ssm-agent
              EOF
}
Lambda Resources Deployment
Create a python script under
scriptsdirectory calledinvokeSSMFunction.pyInvoke The created SSM Document utilizing the below code
import boto3
import os

def lambda_handler(event, context):

    # Retrieve the SSM document name from environment variable (optional)
    # ssm_document_name = os.environ['SSM_DOCUMENT_NAME']

    # Hardcode the document name for simplicity
    ssm_document_name = "ssm_document_shell_configs"
    ec2_instance_id = os.environ['EC2_INSTANCE_ID']  # hold the instance ID from environment variable

    # Create an SSM client
    ssm_client = boto3.client('ssm', region_name='us-east-1')

    # Define command parameters
    document_name = ssm_document_name
    document_version = "1"
    targets = [{"Key": "InstanceIds", "Values": [ec2_instance_id]}]
    parameters = {}  # No parameters specified in the command
    timeout_seconds = 120
    max_concurrency = "5"
    max_errors = "1"


    try:
        # Send the SSM document execution command
        response = ssm_client.send_command(
            DocumentName=document_name,
            DocumentVersion=document_version,
            Targets=targets,
            Parameters=parameters,
            TimeoutSeconds=timeout_seconds,
            MaxConcurrency=max_concurrency,
            MaxErrors=max_errors
        )

        # Print a success message
        print(f"Command sent successfully. Command ID: {response['Command']['CommandId']}")

    except Exception as error:
        print(f"Error occurred: {error}")
- Archive the script as a zip file as the following
pushd scripts  # Change directory to scripts directory
zip invokeSSMFunction.zip invokeSSMFunction.py
Create a file called
lambda.tfDeploy a lambda function holds the created IAM Role and the created script.
# Create a lambda function that invoke SSM Document
resource "aws_lambda_function" "lambda_to_invoke_SSM" {
  function_name    = "invokeSSMFunction"
  filename         = "${path.module}/scripts/invokeSSMFunction.zip"
  source_code_hash = filebase64sha256("${path.module}/scripts/invokeSSMFunction.zip")
  handler          = "invokeSSMFunction.lambda_handler"
  runtime          = "python3.12"
  timeout          = 120
  role             = aws_iam_role.iam_role_ssm_full_access.arn

  #   vpc_config {
  #     subnet_ids         = [aws_subnet.subnet_1.id]
  #     security_group_ids = [aws_security_group.security_group_1_ec2.id]
  #   }

  environment {
    variables = {
      EC2_INSTANCE_ID = aws_instance.ec2_instance_1.id
    }
  }

}
Apply Terraform Code
After configured your Terraform Code, It's The exciting time to apply the code and just view it become to Real. 😍
- First the First, Let's make our code cleaner by:
terraform fmt
- Plan is always a good practice (Or even just apply 😁)
terraform plan
- Let's apply, If there's No Errors appear and you're agree with the build resources
terraform apply -auto-approve
Check & invoke SSM
- Check Deployed SSM document
Open-up AWS console, Then navigate to System manager (SSM) at the search bar.
Scroll down under shared resources, Documents, Then Owned by me tab.
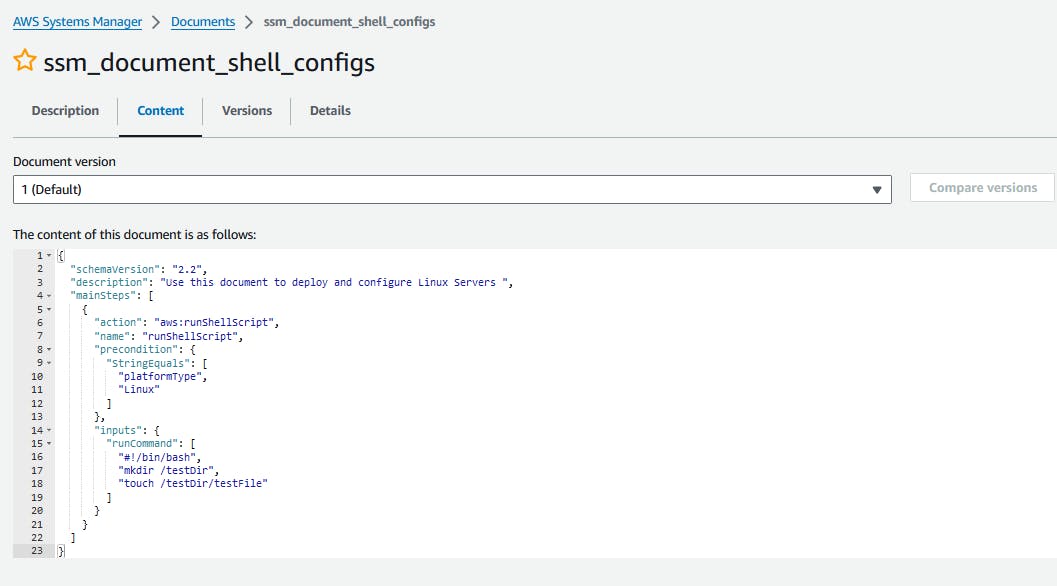
Open-up the ssm_document_shell_configs Document, Then press on content tab to view the document content.
- Check Deployed EC2
- Navigate to the ec2 machine using the search bar.

- Check and Test Lambda
Navigate to lambda resource using the search bar.
Open-up your function, Then scroll down to code section.
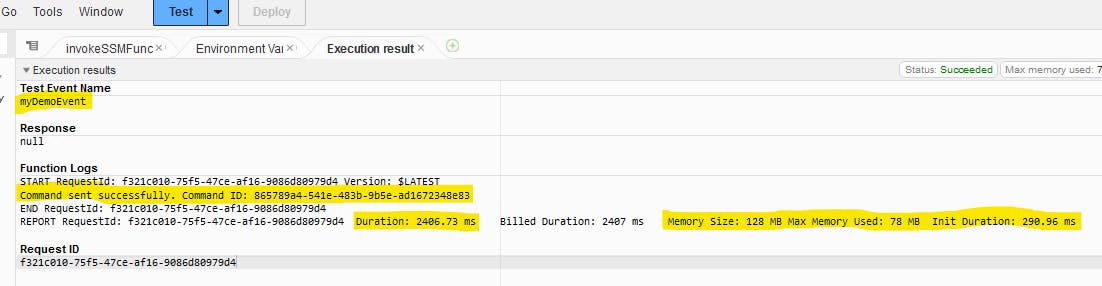
Check your code is exist, Then press on Test button.
Type down any your event name then save.
Press on Test button again to invoke.


- The output should be like the below
- Check the invoked script
Navigate back to the systems manager, Under Node Management specify Run Command.
Under Command history tab, Ensure that the last execution status is success.

- Check the invoked command on EC2
Navigate back to the EC2 console, Specify your EC2, Then connect.
Press on connect
 💡Also, you able to connect from your local terminal as we configured the key pair
Check the created directory and file

Destroy environment
The Destroy using terraform is very simple, However we should first destroy the Access keys.
- Destroy all resources using terraform
terraform destroy -auto-approve
That's it, Very straightforward, very fast🚀. Hope this article inspired you and will appreciate your feedback. Thank you.