

[AWS] S3Bucket - MFT + Terraform Project 03
Manage file Transfer to/from S3Bucket (VPC Endpoint)


![[AWS] S3Bucket - MFT + Terraform Project 03](https://cdn.hashnode.com/res/hashnode/image/upload/v1709542125516/276bbf50-bd8b-45c3-b06f-a5ed9e6a1064.png?w=1600&h=840&fit=crop&crop=entropy&auto=compress,format&format=webp)
Inception
Hello everyone, This article is part of The Terraform + AWS series, The Examples in this series is built in sequence, I use this series to publish out Projects & Knowledge.
Overview
Hello Gurus, 𝑴𝒂𝒏𝒂𝒈𝒆 𝑭𝒊𝒍𝒆 𝑻𝒓𝒂𝒏𝒔𝒇𝒆𝒓, Streamlining Data Flows with Security and Reliability, In today's data-driven world, businesses and organizations frequently need to move files reliably between systems, partners, and Organizations. Managed file transfer (MFT) solutions offer a way to streamline these processes. However, we going to provide our own solution here using 𝑺3𝑩𝒖𝒌𝒄𝒆𝒕, 𝒔3𝒂𝒑𝒊 𝒄𝒐𝒎𝒎𝒂𝒏𝒅, 𝒂𝒏𝒅 𝑷𝒚𝒕𝒉𝒐𝒏.
Today's Example will use S3-Bukcet as a centralize object storage between EC2's, In order to send and receive files automatically.
Building-up Steps
We'll complete on the last article, At The Last Article we build up together Two private VPC's included EC2 machines, Transit gateway that manage all VPC's Routes, and One VPC that have a NAT Gateway and an Internet gateway to route the EC2 machines Traffic to the Internet.
Therefore Today will build-up together the resources, like an S3 Bucket and link it to the private VPC's using VPC endpoint in order allow EC2 machines to send and receive files, Using 𝑻𝒆𝒓𝒓𝒂𝒇𝒐𝒓𝒎.✨
The Architecture Design Diagram:
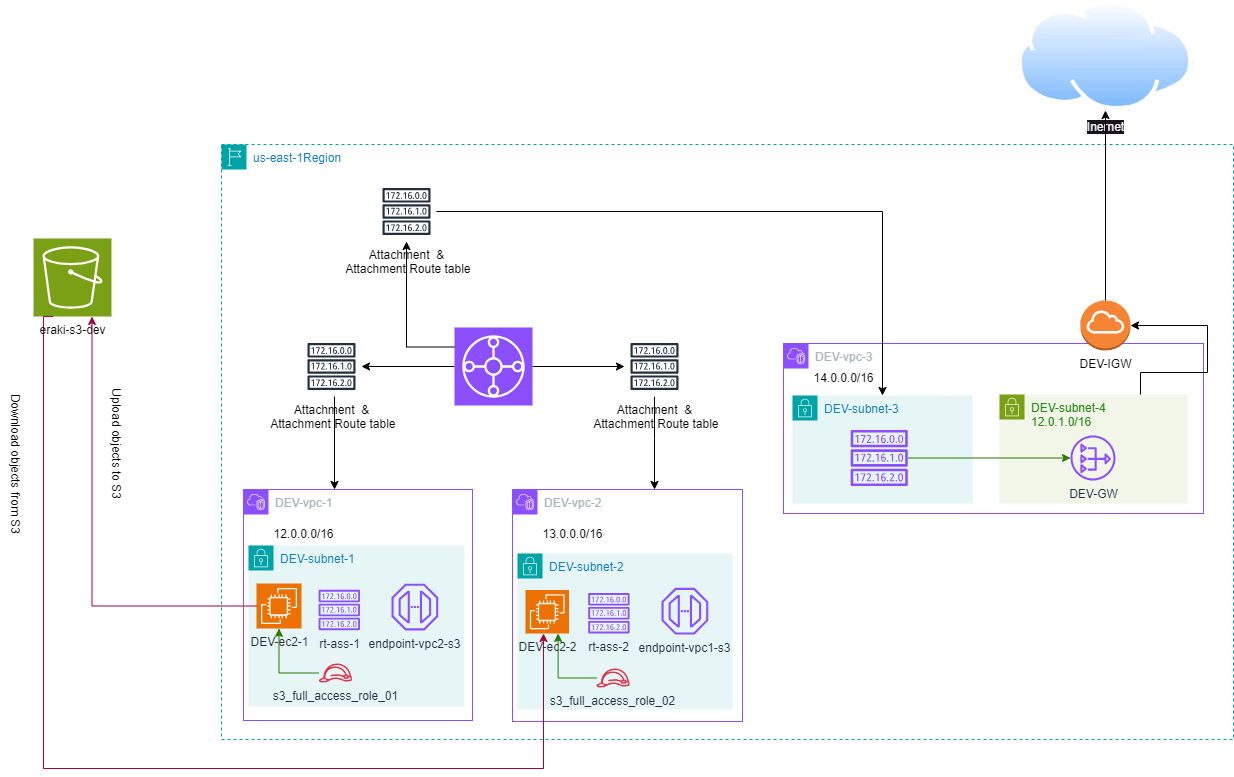
building-up steps Details:
Create an S3 Bucket.
Create Two VPC Endpoint for each private VPC.
Private VPC's that include EC2 machines only.
Link the VPC endpoint using Route tables, This allow any EC2 in this VPC to communicate with The S3, On Condition to have S3 Access policy.
Create IAM Role that have S3 Full access.
Assign the Role to the EC2 Machines.
enough talking, let's go forward...😉
Clone The Project Code
Create a clone to your local device as the following:
pushd ~  # Change Directory
git clone https://github.com/Mohamed-Eleraki/terraform.git

pushd ~/terraform/AWS_Demo/06-S3Bucket
- open in a VS Code, or any editor you like
code . # open the current path into VS Code.
Terraform Resources + Code Steps
once you opened the code into your editor, will notice that the resources have been created. However will discover together how Create them steps by step.
Create an S3 Bukcet
- Create a new file called
s3.tf
- Create The S3 Bucket Resources as the below
# Create an S3 Resource
resource "aws_s3_bucket" "s3-01" {
  bucket = "eraki-s3-dev-01"

  force_destroy       = true
  object_lock_enabled = false

  tags = {
    Name        = "eraki-s3-dev-01-Tag"
    Environment = "Dev"
  }
}

# Block public access
resource "aws_s3_bucket_public_access_block" "s3-01-dis-pubacc" {
  bucket = aws_s3_bucket.s3-01.id

  block_public_acls       = true
  block_public_policy     = true
  ignore_public_acls      = true
  restrict_public_buckets = true
}
s3.tf file as an optional resources, Except the resource I have mentioned here.Create VPC endpoint
Create a new file called
endPoints.tfCreate The VPC endpoints Resources as the below
# Create a VPC endpoint, and link it to the vpc1 route table
resource "aws_vpc_endpoint" "endpoint-vpc1-s3" {
  vpc_id            = aws_vpc.vpc-1.id
  service_name      = "com.amazonaws.us-east-1.s3"
  vpc_endpoint_type = "Gateway"
  route_table_ids   = [aws_route_table.rt-1.id]
  #subnet_ids = [aws_subnet.subnet-1.id]

  tags = {
    Name = "${var.environment}-endpoint1-vpc1Tos3"
  }
}

# Create a VPC endpoint, and link it to the vpc2 route table
resource "aws_vpc_endpoint" "endpoint-vpc2-s3" {
  vpc_id            = aws_vpc.vpc-2.id
  service_name      = "com.amazonaws.us-east-1.s3"
  vpc_endpoint_type = "Gateway"
  route_table_ids   = [aws_route_table.rt-2.id]
  #subnet_ids = [aws_subnet.subnet-2.id]

  tags = {
    Name = "${var.environment}-endpoint2-vpc2Tos3"
  }
}
Create IAM Roles
Create IAM Roles for EC2 machines that have full access on S3 Bucket.
- Create a new file called
iamRoles.tf
# Create an IAM Role 01 for ec2
resource "aws_iam_role" "s3_full_access_role_01" {
  name = "s3_full_access_role_01"

  assume_role_policy = jsonencode({
    Version = "2012-10-17"
    Statement = [
      {
        Action = "sts:AssumeRole"
        Principal = {
          Service = "ec2.amazonaws.com" # Change this if the role is for a different AWS service
        }
        Effect = "Allow"
        Sid    = ""
      },
    ]
  })
}

# Attache the S3FullAccess policy to the created IAM Role
resource "aws_iam_role_policy_attachment" "s3_full_access_att_01" {
  role       = aws_iam_role.s3_full_access_role_01.name
  policy_arn = "arn:aws:iam::aws:policy/AmazonS3FullAccess"
}

# Create an IAM Role 02 for ec2
resource "aws_iam_role" "s3_full_access_role_02" {
  name = "s3_full_access_role_02"

  assume_role_policy = jsonencode({
    Version = "2012-10-17"
    Statement = [
      {
        Action = "sts:AssumeRole"
        Principal = {
          Service = "ec2.amazonaws.com" # Change this if the role is for a different AWS service
        }
        Effect = "Allow"
        Sid    = ""
      },
    ]
  })
}

# Attache the S3FullAccess policy to the created IAM Role
resource "aws_iam_role_policy_attachment" "s3_full_access_att_02" {
  role       = aws_iam_role.s3_full_access_role_02.name
  policy_arn = "arn:aws:iam::aws:policy/AmazonS3FullAccess"
}
Attache IAM Roles to EC2 Machines
First, Create aws_iam_instance_profile in order to mention it to the ec2 machine.
- open-up
main.tffile, and create an instance profile resource for ec2-1
resource "aws_iam_instance_profile" "s3_full_access_profile_01" {
  name = "S3FullAccessProfile01"

  # specify the name of the created IAM Role
  role = aws_iam_role.s3_full_access_role_01.name
}
- Attache The Instance Profile/IAM Role to ec2-1, by adding the below argument to the
aws_instanceec2-1 resource
# mention the instance profile that have the IAM Role
iam_instance_profile = aws_iam_instance_profile.s3_full_access_profile_01.name
- create an instance profile resource for ec2-2
resource "aws_iam_instance_profile" "s3_full_access_profile_02" {
  name = "S3FullAccessProfile02"

  # specify the name of the created IAM Role
  role = aws_iam_role.s3_full_access_role_02.name
}
- Attache The Instance Profile/IAM Role to ec2-2, by adding the below argument to the
aws_instanceec2-2 resource
# mention the instance profile that have the IAM Role
iam_instance_profile = aws_iam_instance_profile.s3_full_access_profile_02.name
Apply Terraform Code
After configured your Terraform Code, It's The exciting time to apply the code and just view it become to Real. 😍
- First the First, Let's make our code cleaner by:
terraform fmt
- Plan is always a good practice (Or even just apply 😁)
terraform plan -var-file="terraform-dev.tfvars"
- Let's apply, If there's No Errors appear and you're agree with the build resources
terraform apply -var-file="terraform-dev.tfvars" -auto-approve
Check S3 File Steaming
using s3apicommand
By using s3api commands, you can manage your S3 storage programmatically through the AWS CLI. This offers greater automation and control compared to using the S3 console interface.
Check our configuration integration.
Will upload a Dummy file from ec2-1 to the S3 Bucket, Then Download the file to ec2-2.
Uploading from ec2-1
Login into ec2-1 using the endpoint as we discovered before here.
Create a Dummy file
touch upload.file
- use the below command to upload
upload.filefile.
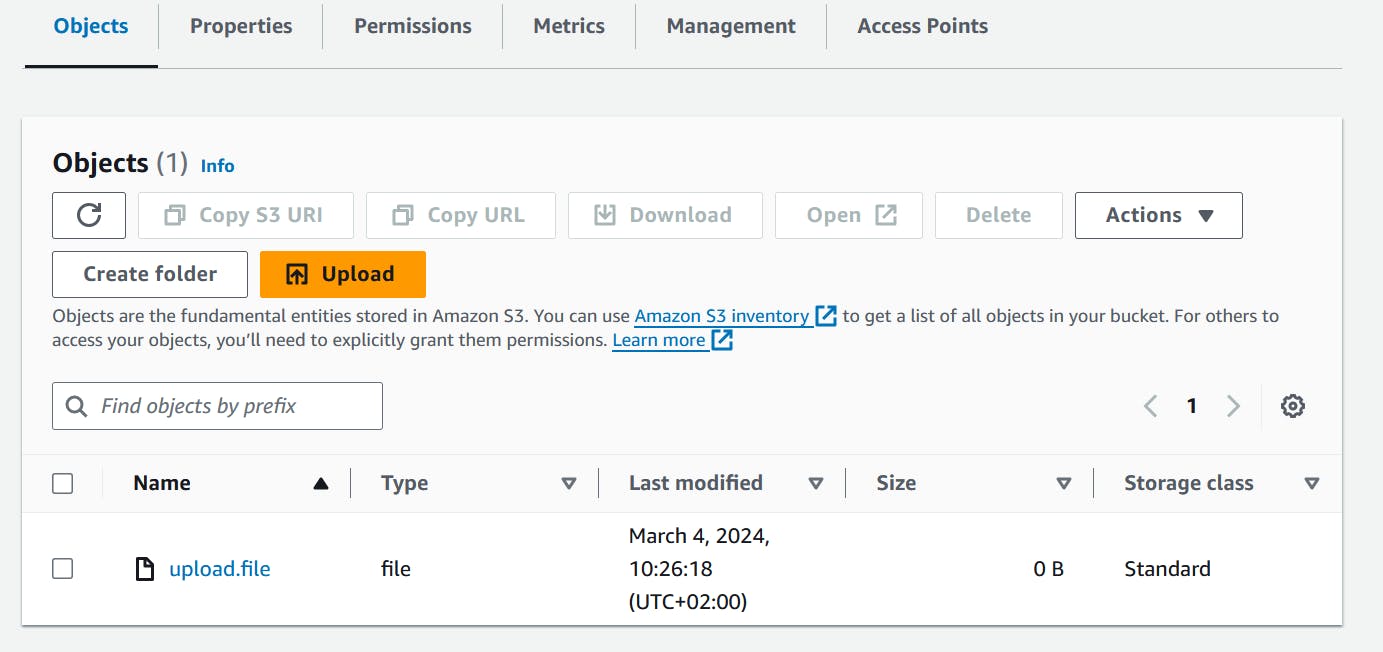
aws s3api put-object --bucket eraki-s3-dev-01 --key upload.file --body upload.file
The --body parameter in the command identifies the source file to upload. For example, if the file is in the root of the C: drive on a Windows machine, you specify c:\upload.file. The --key parameter provides the key name for the object on the S3 Bucket.
Check the S3 Bucket on the AWS console, Should be uploaded.
Downloading to ec2-2
Login into ec2-2 machine as the previous step.
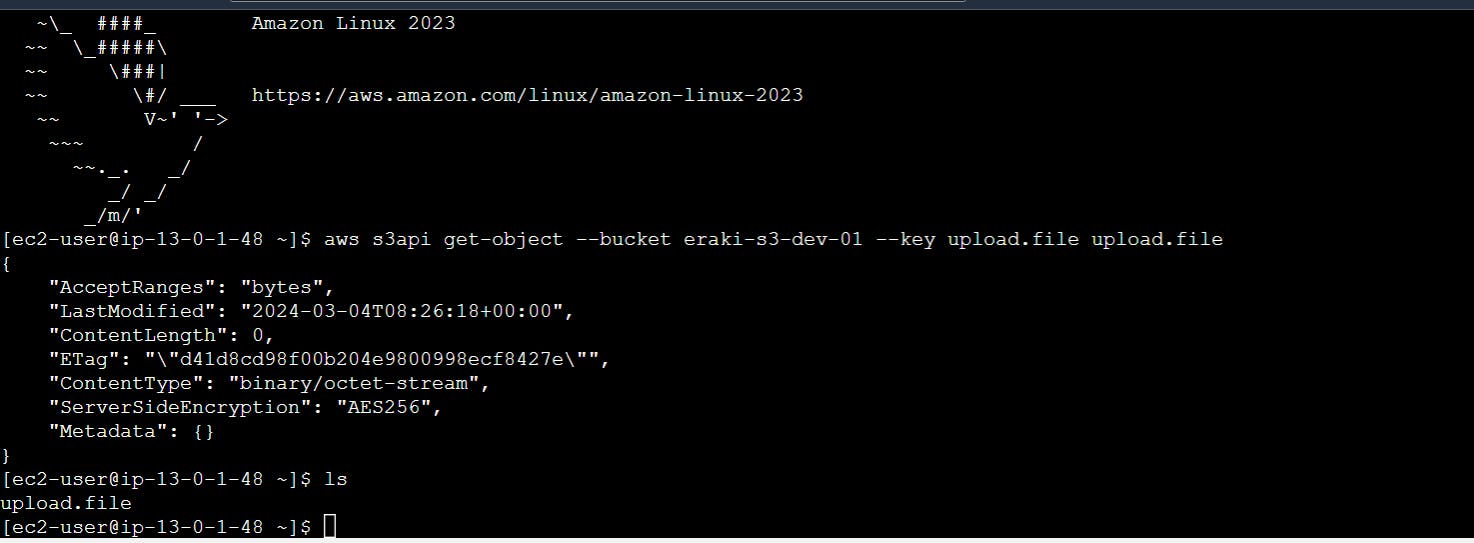
use the following command to download the file
aws s3api get-object --bucket eraki-s3-dev-01 --key upload.file upload.file
Using Python script
Uploading from ec2-1
Login into ec2-1 using the endpoint as we discovered before here.
Create a dummy file called
upload.fileCreate a python script as following
vim upload.py
- Past the below content:
import boto3

s3_client = boto3.client('s3')
object_name = "upload.file"

bucket_name = "eraki-s3-dev-01"
file_path = "/home/ec2-user/upload.file"

try:
    object = s3_client.upload_file(file_path, bucket_name, object_name)

    print(f"File '{file_path}' uploaded successfully to S3 bucket '{bucket_name}' / '{object_name}' !")
except Exception as e:
    print(f"Error uploading file: {e}")
- Adjust the script permissions
chmod 775 upload.py
- Install prerequisites:
# check python version
python3 --version
Python 3.9.16

# install pip3
curl https://bootstrap.pypa.io/get-pip.py -o get-pip.py && python3 get-pip.py

# install boto3 library
pip3 install boto3
- Run the script
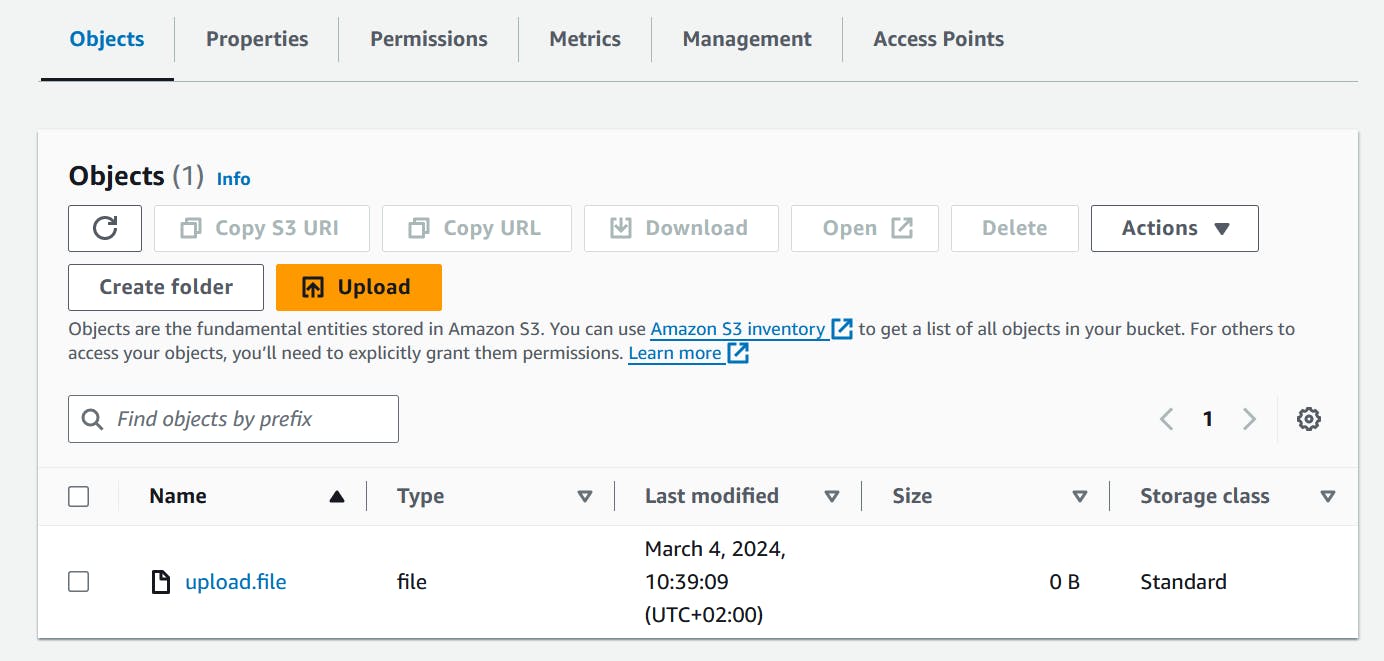
python3 upload.py
- Check S3 Console
Downloading to ec2-2
Login into the ec2-2 as the previous step
Create a python script as following
vim download.py
- Past the following content
import boto3

s3_client = boto3.client('s3')
object_name = "upload.file"  # The name of the file in the S3 bucket you want to download

bucket_name = "eraki-s3-dev-01"
download_path = "/home/ec2-user/upload.file"  # Local path to save the downloaded file

try:
    s3_client.download_file(bucket_name, object_name, download_path)

    print(f"File '{object_name}' downloaded successfully from S3 bucket '{bucket_name}' to '{download_path}' !")
except Exception as e:
    print(f"Error downloading file: {e}")
- Adjust the script permissions
chmod 775 download.py
- Install the prerequisites
# check python version
python3 --version
Python 3.9.16

# install pip3
curl https://bootstrap.pypa.io/get-pip.py -o get-pip.py && python3 get-pip.py

# install boto3 library
pip3 install boto3
- Run the script as following
python3 downlaod.py
Destroy environment
The Destroy using terraform is very simple, However we should first destroy the resources that have been created manually, Follow the steps below.
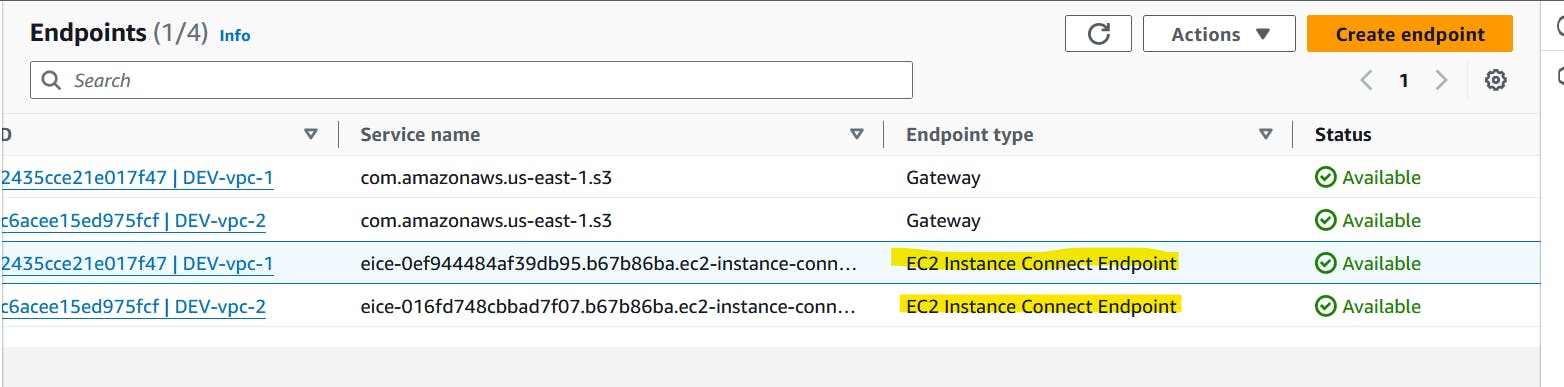
Delete the VPC endpoint (Manual resource)
open-up VPC console, and locate endpoints under Virtual private cloud section
Delete the EC2 Instance Connect Endpoints
Destroy environment using Terraform
Once ensure The EC2 instance connect endpoints have been deleted submit the following command
terraform destroy -var-file="terraform-dev.tfvars"
Conclusion
By integrating With S3, organizations can gain a number of benefits, including improved data security, simplified data management, and increased operational efficiency. S3 provides a secure and scalable storage solution for MFT files, Besides the AWSCLI s3api command and boto3 aws library for managing file streaming.
That's it, Very straightforward, very fast🚀. Hope this article inspired you and will appreciate your feedback. Thank you.